VPN VS ZTNA : What Is Best For You?
I have been trying to find the best solution for being able to securely remote into my network to be able to access my computer and also future proof for other media devices or a NAS but with so many different options you are unsure what to use and what even it all means. I will explain the different technologies, the way to use them and what you should choose for your needs and priorities.
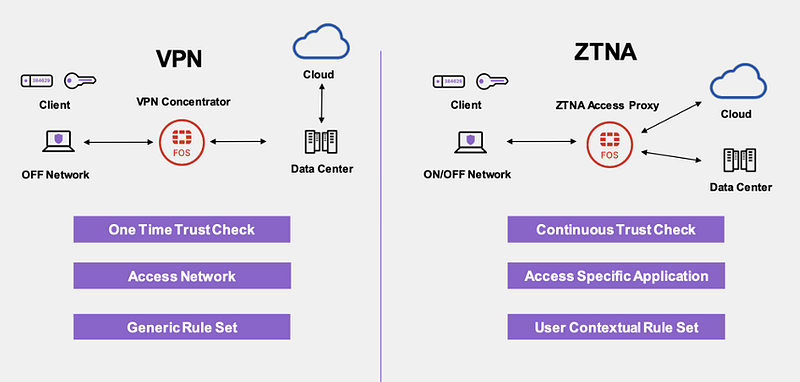
What is a VPN ?
A VPN is a Virtual Private Network. It allows you to be able to connect to a virtual remote network that bypasses your internet service provider and makes your data flow through it at all times.
What some people see as an issue is that if you are using a VPN that is by another company then you are basically trusting them with your connection. This is because with a VPN, it is a one time trust protocol where once the connection is established its assumed that everything is secure and it just acts like a normal connection after. This issue can be fixed by setting your own VPN server but that is time consuming.
What is ZTNA ?
Zero trust network access is a way to create secure access to relevant services based on accounts or devices. It gives a bigger modular control to the user on who can access what and where making it much more secure and trustworthy.
The benefits over a VPN is that its more secure than a VPN, it also boosts higher speeds as it makes it so you are only connecting to what you need to connect and it has better scalability because it provides application security that is not dependent on the network
Our solutions today will use VPNs but add a zero trust methodology to make the system more secure!
Then why still use VPN’s ?
Because VPNs have been around for longer they work better with legacy systems and also for smaller scale network access VPNs are much easier to install.
There also is the issue with there not being many options for self hosting open source options that will give you exactly what you need. And VPN are much more cost effective compared to ZTNA as the cost can increase drastically based on the amount of users that are allowed in the network
Setting up Tailscale (ZTNA)
Tailscale is a zero trust VPN solution that uses the existing wireguard protocol. It is a very easy solution to setup. It will take 5 minutes to setup and you are ready to go. And the great thing is that you will not need to setup any firewall or setup any keys because tailscale does it for you.
The only downside to this solution is that tailscale manages all of this for you so you are in the hands of the company. If you are unsure about that because of reasons where they can change TOS or change the pricing any time they want, move to the other 2 options
Setting up :
- Go to tailscale’s website, and click on get started. You will see the instructions to be able to create an account.
- Next follow the steps to be able to add 2 devices to your network. I chose my PC and my phone (iOS).
- Once done and logged in you can turn on the VPN and you will be able to remotely access your computer.
The solution for linux is a bit harder but follow the documentation for your distro and you will be able to set it up the same way as per windos or mac
Setting up OpenVPN
If for you ZTNA is too over kill and you just want to use a simple VPN server than this will teach you how to set it up on AWS. You can choose a different provider like Azure or you can even set it up on your local Raspberry Pi. I chose AWS as it is a very common tool used and I prefer cloud solutions
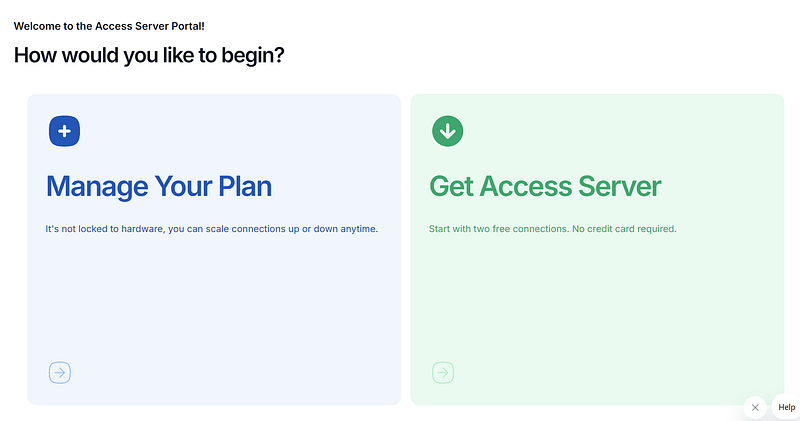
- Go to OpenVPN’s website and create an account, you will be given an option to check access server, the other option is openvpn’s cloud which we won’t use as using tailscale’s cloud is better
- Then you will see a page like this
3. We will click on the get access server and we will see this
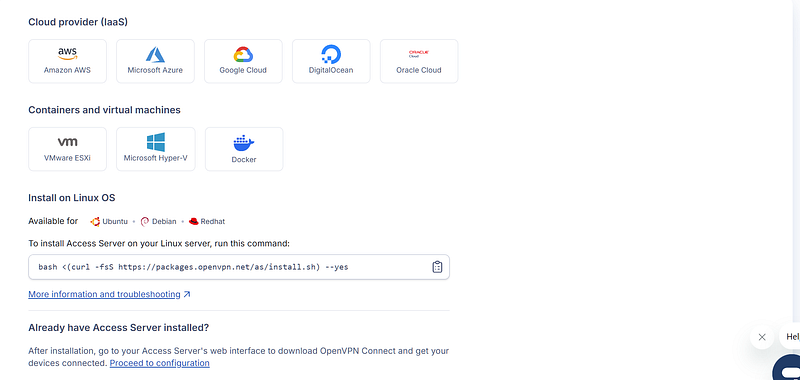
4. You can click on AWS and it will ask for a region and you can click launch script on AWS.
What this is doing is that, OpenVPN has a configuration for AWS that creates a CloudFormation script, which is infrastructure as code so it will run the script and automatically setup your server as you will need it
5. Fill in the missing details like VPC ID, Public Subnet ID ,Instance Name and Instance Type. You can then accept and let this run for a bit till you see process complete
6. click the Outputs tab.
7. Take note of the admin portal URL for the Admin Web UI and the password.
8. Click the URL to open the Admin Web UI.
Make sure you change the temp log in password to something you use in the
9. You can now log in and have your server setup. You can configure the settings as you need.
All you need to do now is download the client on your devices and you have a VPN connection to interact with them
Setting up Zero Tier One :
This is the last and hardest option but this gives you full control over your ZTNA network controller as it is opensource and free, you will be able to have as many devices as you need and will only need to pay as you use.
Getting started :
- Make sure to have an AWS account already created
- Create an AWS Instance with ubuntu LTS, t2.micro with a new security group that gives access to inbound rules for the Zero tier network for the port 9993 and also open the http, https ports so as to be able to access the UI
- Connect to the instance and install zerotier-one
curl -s https://install.zerotier.com | sudo bash4. Next make sure that the cli is installed
zerotier-cli info5. Next we will install the UI (You need to have docker pre-installed)
curl -L -O https://raw.githubusercontent.com/dec0dOS/zero-ui/main/docker-compose.yml

docker pull dec0dos/zero-ui

docker-compose up -d --no-build

# To check if everything is okay
docker-compose logs -f
6. Now you can access the UI
With these steps done you are now able to add all of your devices to your network by adding them to and you can use the zerotier vpn to access all of your devices remotely
And that’s it, you have officially setup a secure remote access to be able to access everything and setup a home network and be self hosted if you want. If you have any questions or feel like I missed something than you can email me or @ me on twitter @ gauranshmathur.
Member discussion