The Easiest Arch, Hyprland, Neovim, and Tmux Setup

Linux can be scary and confusing and can take a lot of your time. But as a dev, if you are looking to maximise your efficiency and also have a fun time using the best technology's, I will guide you on how to setup a complex setup in the easiest way possible.
For this workflow it will be best to use an external drive that is removable. This will allow you to remove the drive and be able to have it as portable installation.
Part 1 Arch
You first would need a distro. A linux distro is a unique linux distribution that has been packaged in its own way. You may have heard of Ubuntu, Debian, Fedora. They all have their own software and package managers. For our purpose we will be using Arch.
Benefits of using Arch :
- Rolling release model — you get the latest software updates and packages without needing to wait for a new major release
- Minimalism — Arch doesn’t come with anything and you only start with the really important packages.
- Community Support — The community support on Arch is amazing and its really helpful with installation and debugging.
Part 1.1 Getting Arch
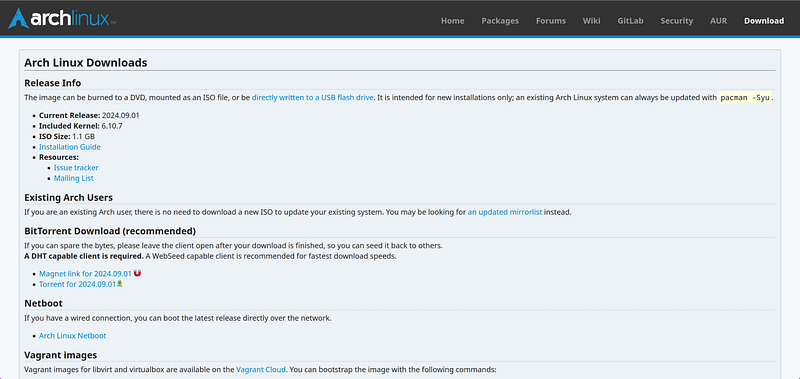
Go to https://archlinux.org/download/ and download the ISO (International Organization for Standardisation). This is an optical disk image that runs the graphical installer. Best way to download this is using the magnet link. If you do not have a torrent client, https://www.qbittorrent.org/download. Qbittorrent is an open-source BitTorrent client.
Now we will flash the image to a USB drive using BalenaEtcher https://etcher.balena.io/#download-etcher.
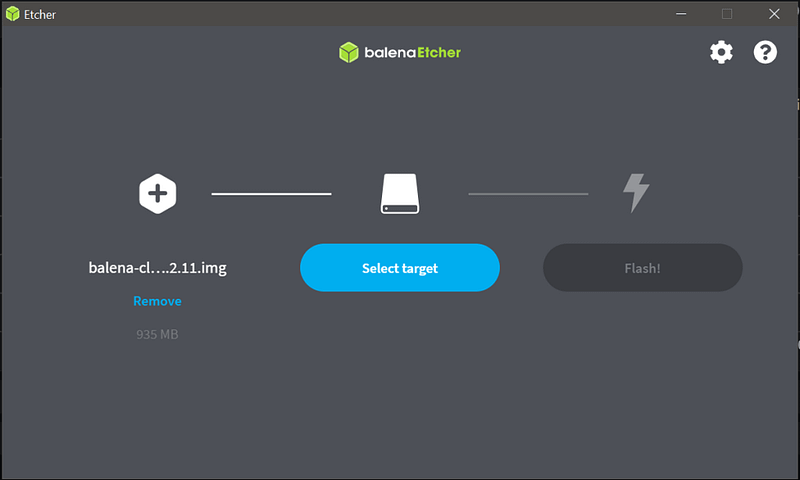
Select your ISO file, select the target, be very careful to select the right drive, and then flash the Image.
Part 1.2 Booting into your drive
- If you are on windows 11, do make sure that you go into your UEFI settings and turn of secure boot. Unless you have any encrypted folders, this should not affect you
- If you want to make your linux drive your main, you will need to switch the boot order in your UEFI
Make sure to restart your computer and enter your boot switcher.
- On windows, del, f12, f8 can be different ways. You should check to see the loading screen
- On mac, you can press and hold the startup button or hold the option button on an external keyboard.
Once loaded you will see this screen
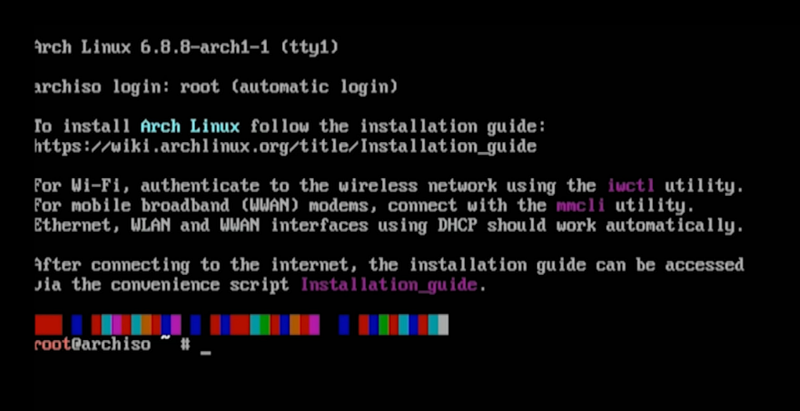
If the screen is too small you can type setfont ter-132b. Make sure to type ping 8.8.8.8 to test your internet connection, if you are on wifi and unable too get any packets. https://wiki.archlinux.org/title/Iwd, follow this tutorial to connect to wifi. Ethernet should work automatically
Part 1.3 ArchInstall
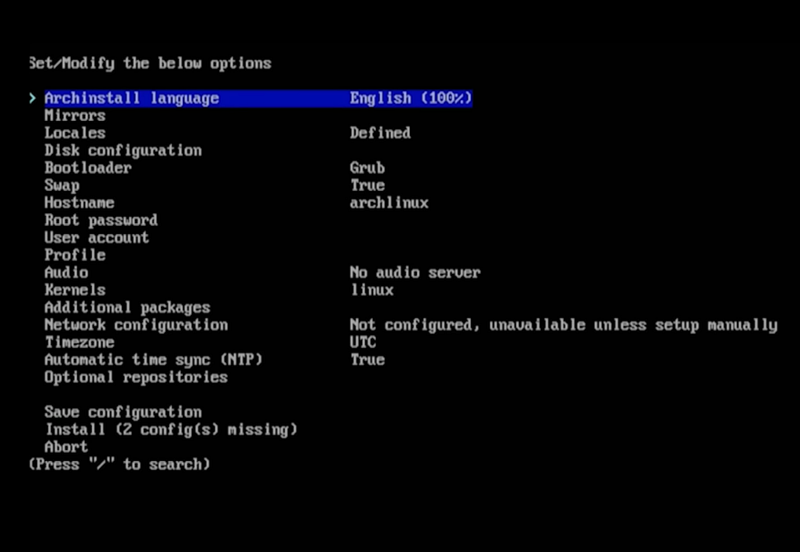
Now that we are in our installation. We will now use the install script, just type archinstall to get started. You can move around with arrow keys and press enter to confirm your selection
- Go to mirrors and select your country. Always best to use mirror locations as they are faster due to them having lower latency. Downloading from a mirror further than you will take longer
- Next we will select disk configuration, choose your disk that you want to install to. You now have an option to select the file system. If you need a system that needs snapshots due to a lot of system changes that may break your install BTRFS is your way to go, or just choose ext4 which is a normal file system.
- Next, make sure you use Grub as your boot loader, you can checkout other boot loaders if you have a specific use case but Grub works fine for everyone.
- Go ahead and enter a password for your root account, don’t worry if it says weak password. You can make it whatever you like
- Next create a user account that you will be using, this is different as you will be using a single user to work with normally, the root account is needed for system wide configuration if you have multiple users, user groups etc.
- Go to Profile and click on gnome. We will use gnome to have the ability to switch between gnome desktop environment and hyprland, in case hyprland breaks for some reason. Do not install hyprland from here.
- Make sure that for gnome drivers, if using NVIDIA use proprietary drivers. Only this way
- For audio, you can go ahead and choose pipewire, it is the newer audio server and needed for Hyprland which we will take about later.
- Go ahead to additional packages and download nano, vim or neovim. We will download neovim later in this tutorial so you can skip this now if you want, we just need a text editor for file configs later
- Go to network configuration and click on use network manager.
- Now you can click on install. Once installed you can reboot the system to launch into gnome
Part 1.4 Cleanup
Once logged into gnome, we are going to do a few things to setup before we start configuring hyprland.
Go into your terminal and type sudo pacman -Syu this should update all packages necessary.
Now we will need to install yay. Arch has AUR packages, these are packages maintained by the community and uses a different package manager than pacman
To install yay, go to

sudo pacman -S --needed git base-devel
git clone https://aur.archlinux.org/yay.git
cd yay
makepkg -si
We are cloning and making the package. Once done, you can check if yay is installed by doing yay — version.
You can do yay -Syu to update all the packages when needed.
We also need to make sure that we are using wayland
echo $XDG_SESSION_TYPEThis will tell you if you are using x11 or wayland. x11 and wayland are display protocols. Hyprland uses the wayland protocol so its neccesary that you are running wayland.
Gnome starts up in x11 so we will force it to use the wayland protocol.
ln -s /dev/null /etc/udev/rules.d/61-gdm.rulesThis should start start wayland on reboot, so you can reboot your system now.
Part 2 Hyprland
Hyprland is a tiling window manager. Normal desktop environments like gnome or KDE have floating windows, so do other operating systems. You can open 2 applications in split view but they are split only then and they are not managed.
Hyprland is the current best standard for using tiling window managers, as it uses wayland that reduces a lot of tearing and has animations and a much better feel than other managers like sway (also uses wayland) an i3wm (uses x11 xorg )
Here is an example of a riced Hyprland setup:
Ricing is a term used in the unix commuinity refering to customising our environments to make them look useful and good.
Part 2.1 Installing Hyprland
To install Hyprland, we will infer from the wiki for most of the steps
- Install hyprland’s git repo. We want to use the latest version available as hyprland is still in its early stages and a lot of common issues are being patched very quickly, this will allow you to always have the latest patches yay -S hyprland-git
- After Installing, if you logout or reboot, in the cog wheel on the bottom right corner of your login screen you should see hyprland
To check if you have hyprland installed correctly, make sure to run
Hyprland --versionPart 2.2 ML4W
Now for our ricing, instead of building all the dotfiles, downloading all needed packages we will use mylinuxforwork. They have an amazing repo that configures everything for us step by step and after installation have a very good UI setup for configuration that allows you to change variable values from a settings like menu

Make sure to read the wiki after if you wish to configure the files in your own way after. This will depend on if you have a dual monitor setup, if you need certain workspaces only to exist on a certain monitor and also regarding DPI scaling.
yay -S ml4w-hyprland-git


#Start the installation
./ml4w-hyprland-setup
After downloading we will follow the installation methods. Make sure to keep current desktop environment, keep keyboard layout to us.
You have now successfully installed ml4w and can now boot into hyprland to see how it looks like.
You will be able to change certain things using the settings provided, have a look around to see all the settings. To change monitor settings or others that aren’t available just open the .conf file relating to it with your preferred editor
Since we are using neovim, you can use this command to go to the folder to check out the dot file
nvim ~/.config/hyprPart 3 Neovim and Tmux
Neovim is a CLI IDE that is ran from your terminal. It starts of very bare bone but has a lot of ways for customisation. It is a keyboard based editor that uses keys and commands to move around and do tasks such as copy paste and jumping around. These are called Vim Motions.
Vi was the first iteration that came out before the mice existed. It was very bare bones and didn’t have syntax checking or highlighting or colours. then we had Vim which is still used today but vim script which was used for plugins was terrible which is why we have Neovim today, it uses lua as its language which makes customisation and management a lot easier.
Tmux is a open-source terminal multiplexer, this means it allows you to have multiple terminals in 1 terminal window. For cases like web development where you have to run the program, edit using neovim and also install packages you can manage everything in 1 terminal window without any issue.
Part 3.1 Tmux
Installing tmux is very simple, we will be using the basic version as there is no need for an up to date release necessary. But if you need the git version for the package just add -git to the end of any package. (Reminder, git versions are available only with yay not pacman.
sudo pacman -S tmuxTo start tmux, all you need to do is just write tmux and you are in. There are different tmux configurations to make it look nicer if you want but we will not cover it here.
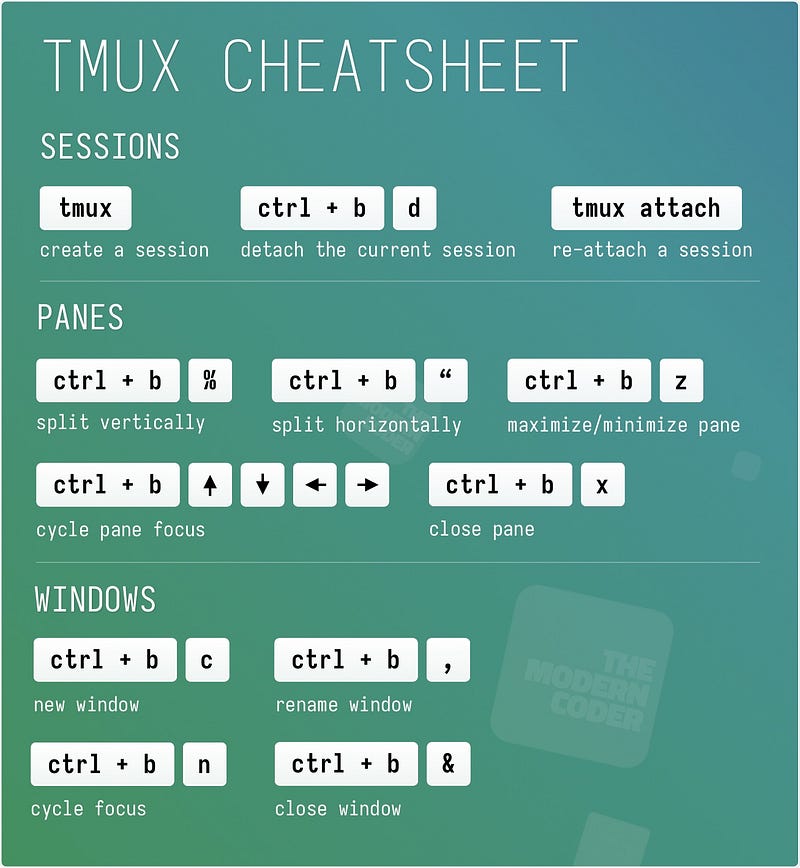
Here is a cheatsheet to tmux commands
Part 3.2 Neovim
We will install neovim the same way
sudo pacman -S neovimFor this we will simply use LazyVim, instead of configuring. This way you have an easy way to test neovim and get used to it before trying to build your own.
To install LazyVim:
We will use this wiki, it contains all ways to customise the installation but you should focus on getting used to using it first before installing more things.
git clone https://github.com/LazyVim/starter ~/.config/nvim

# Remove the .git folder to customise
rm -rf ~/.config/nvim/.git
You can now start neovim and you should be good to go. Make sure to remember commands like :Lazy, :LazyExtras, :Mason. These will be how you install LSP (Language Server Protocol). :checkhealth is to check what is missing, you can download most of the packages using pacman, or even npm if you are using node.
For some tutorials or help :Tutor will guide you through basic commands and :help < package > will tell you more about anything you need help on.
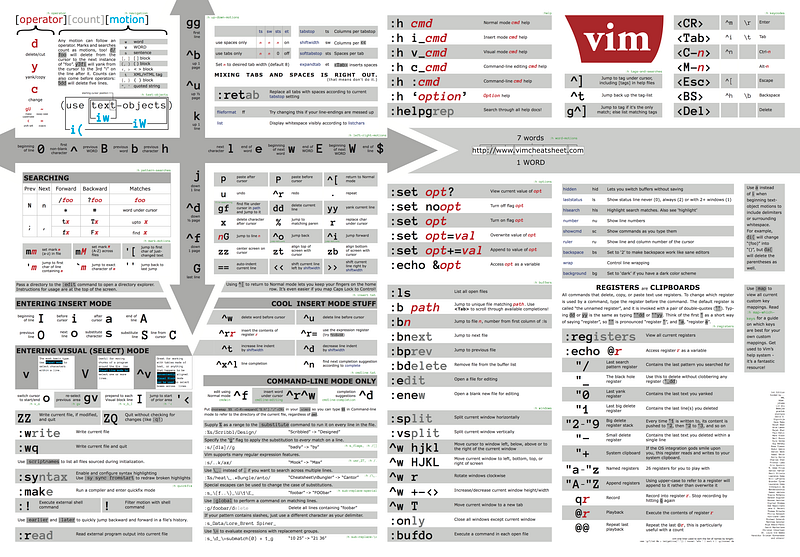
Here is a Vim Motions cheatsheet
This concludes everything you will need to setup yourself to get started with linux, tiling managers and vim. If you encounter any issues feel free to message on twitter @ gauranshmathur.
Member discussion