Kubernetes Fundamentals: Uses, Purpose, and Key Components: Part 1

What even is kubernetes? Why should I care?
If you aren't working in tech or you are just starting schooling to learn computer science, Kubernetes is something you will hear somewhere down the line, but it feels very foreign. But I'll try my best to explain everything as simply as possible so you will know the front back and inside out.
Kubernetes was created in 2014 by google, it's also called k8s so to abbreviate I will also just say that in this post. It comes from a word kubernḗtēs which is the romanised greek word for helmsman and governer. You can also take note that Kubernetes has such stuff like helm charts which I will discuss later.
The reason it was created was because it was made to address the challenges of deploying, managing, and scaling containerised applications in a large-scale, distributed environment.
Current usage and need
Most if not all new applications made are containerised, if you do not know containers, they are isolated built environments that allow you to run the application without having to install specific packages on your system and you use images. Examples like docker, is used to create these images
When you are building services, we are building micro-services, these decompartmentalise the main system into multiple parts so individually they become individual parts that are not dependent of different parts of the service, think of it like splitting a website into the front end, api and database seperately. This way if you need more api, you just need to run more api images.
When having to handle it like this, the issue is you won't want to run it all in 1 machine because thats not smart, it could shut off and your whole service is now down, and you want to have something centralised that can manage multiple machines to be able to run different types of things, and have good control on what should run where.
This is where kubernetes comes in
Because it is a container orchestrator, it will manage the machines and the images you are running in the way you want it, it allows you to add as many machines as you want and can make it feel like 1 system where you can run everything you need.
Now this is over-simplifiying so that you can understand why we use k8s and why its important. I will also now explain more in detail the parts of k8s, not too much in detail but enough for you to understand what makes k8s run.

If you are intrested in kubernetes and certifications related to it, these topics are the ones you will learn while preparing for the exam
What makes K8s tick?
First we will talk about it the basic parts that will then we can learn about the exact flow of how running something will work
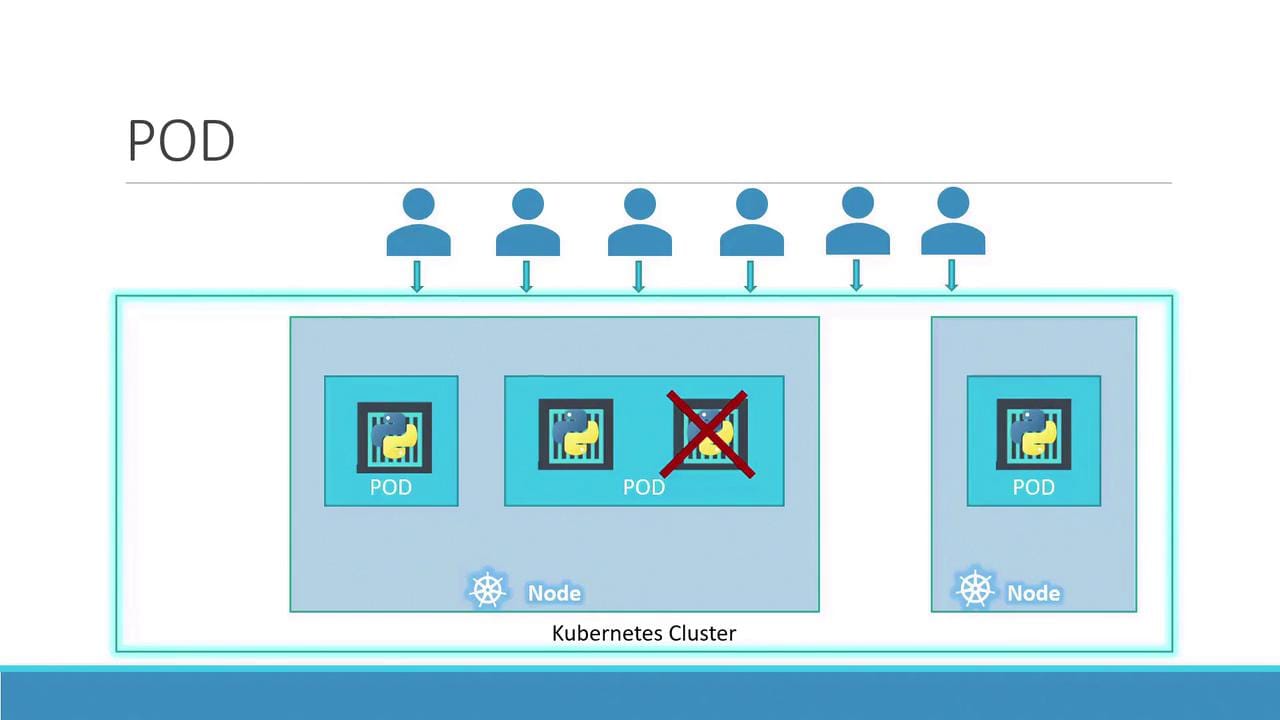
PODS:
A pod is an encased application, most of the time a singular or coupled images that we are running, things that can't run separately are normally ran in a pod together. This is the most important and basic thing that will always be what we looking at for our applications running
Deployments:
Now pods are our basics, but they are individual, they are super basic so working with it is more useful for testing rather than an actual deployment 😉. Deployments can run multiple pods and be structured in a way to tell it how many to run as well has things like rolling back, keeping the state of how many pods you need to have running and also updating in ways you configure it to. These are mostly what you will be working with when you deploy your application
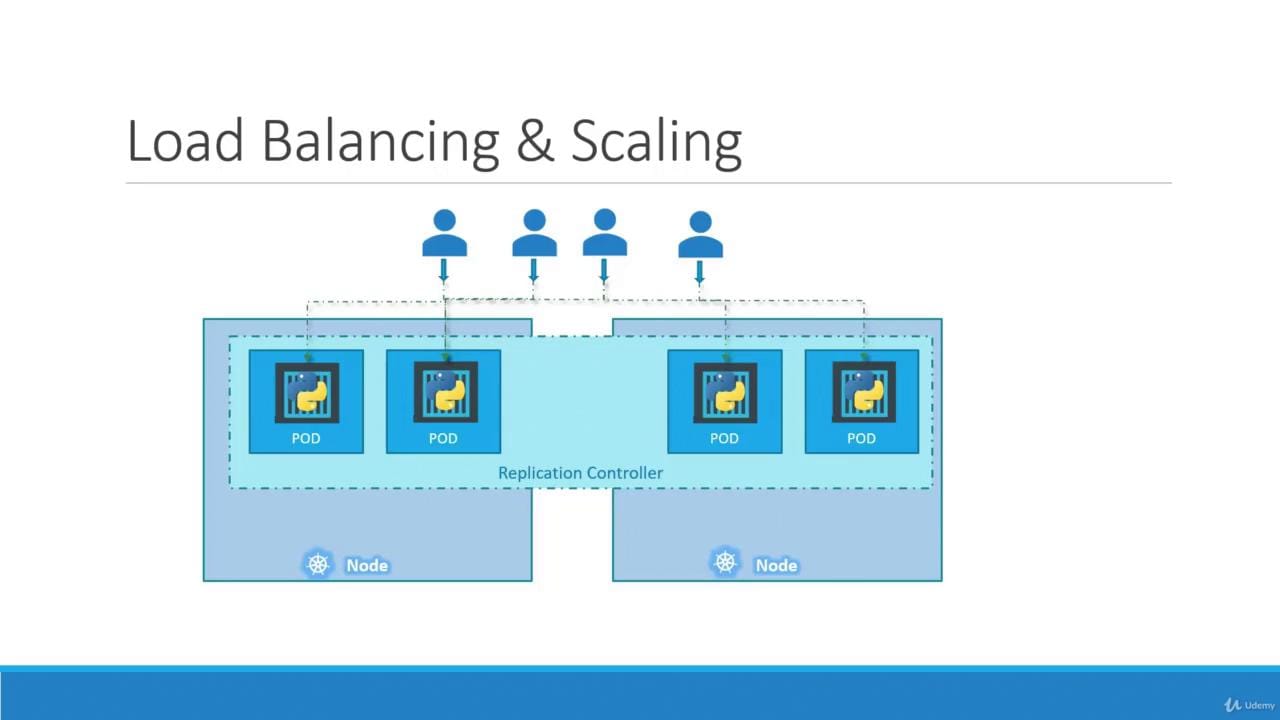
Service:
You have deployed your application but how will you access it? You need the service, you can make it so that it either is handled to use the IP address of the machine, or it could be using a Load Balancer that will make all the pods you deployed interact on the basis of an external IP that you have names
So when you are trying to deploy an application you will create YAML files like this
apiVersion: apps/v1
kind: Deployment
metadata:
  name: example-deployment
spec:
  replicas: 3
  selector:
    matchLabels:
      app: example
  template:
    metadata:
      labels:
        app: example
    spec:
      containers:
      - name: example-container
        image: example-image
        ports:
        - containerPort: 80
And you will then apply these files using the kubectl command kubectl apply -f <filename.yaml>
I will explain more about how this works in part 2 but just as a basic, normally we control kubernetes from another computer and comunicate via api. kubectl is the cli command line tool for this
So if you want to deploy these are the basic steps you will need to know to be able to deploy and access you application
Kubernetes components
I will now talk about the components that make Kubernetes work and do everything we have been talking about
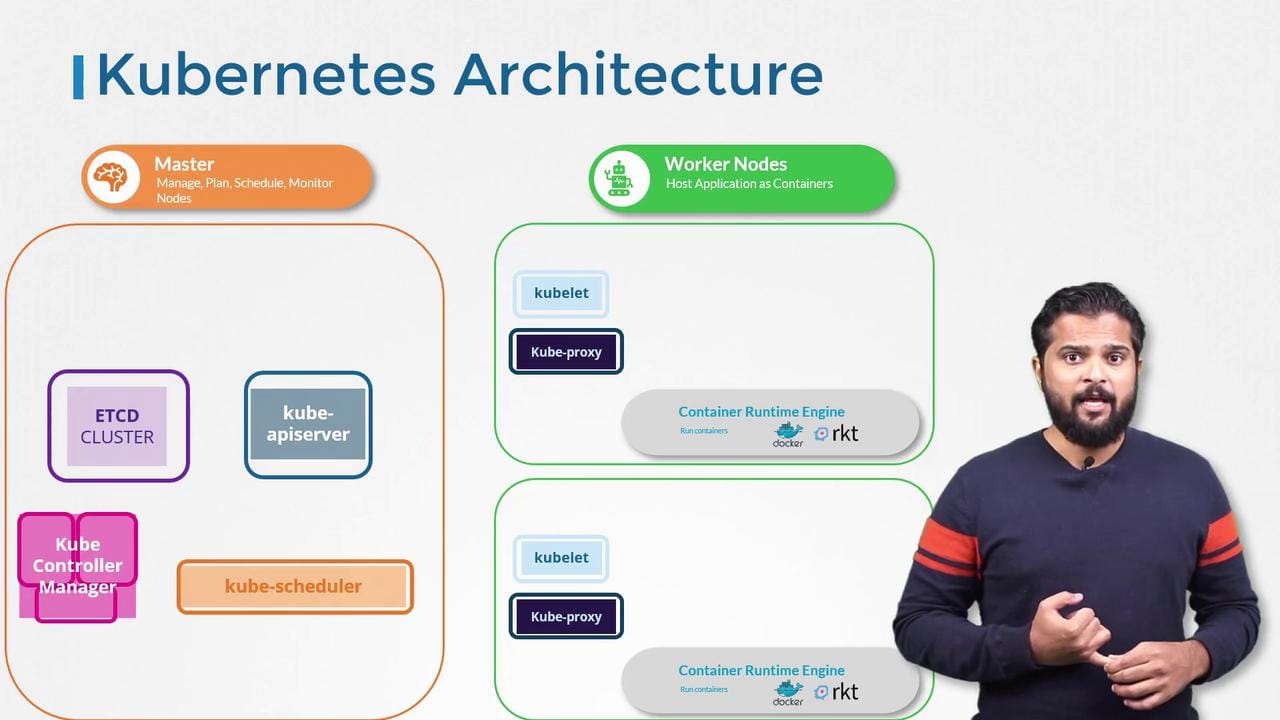
Master and Worker
The way your K8s cluster works is based on how you would want to setup your machines, you will need a master node a.k.a Control Plane that will contain the main components to tell where things need to go and what needs to be deployed. You can have more than 1 master, but ...
So if you only have 1 master, and that crashes and breaks, you will be in a lot of trouble which is why having ETCD backups is quite important, if you want to know more about how to backup you can check my post about k8s backups and why you need them.
You will be creating a cluster in which you will be able to see all the machines a.k.a Nodes and you will communicate with the CP ( Control Plane)
Components
- ETCd: This is your clusters trusty vault a distributed key value store that stashes all the config data and state info keeping everything consistent and highly available so nothing falls apart during chaos. In my homelab tinkering I've learned it's only directly touched by the API server which is smart for security, one wrong poke elsewhere and you're debugging for hours.
- Scheduler (kube-scheduler): Picture this as the smart matchmaker for your pods, it assigns fresh ones to the right nodes weighing in on resource availability constraints affinity rules and data locality to avoid any performance hiccups. From my internship days deploying apps on K8s tweaking those rules has saved me from overload disasters .
- Controller manager (kube-controller-manager): Its like a bundled toolkit running various controller processes think node job and endpoint (which is where your kubernetes is listening) e.g 192.168.10.10:6443. Port 6443 is kubernetes' default port. In my homelab experiments this has auto healed failed pods without me noticing because it won't allow any drift making sure your cluster is in its desired state
- API server (kube-apiserver): The grand entrance to your Kubernetes world this handles every internal and external request validates them on the spot and acts as the ultimate comms hub for the whole cluster. Ive locked myself out once by botching its config in a test cluster lesson learned Start here for any troubleshooting as its where all the action funnels through.
- Kubelet: This is the boots-on-the-ground agent living on every node, constantly chatting with the API server to grab pod specs and making sure containers are actually running like they should. In my homelab nightmare when pods kept crashing on one node, tailing kubelet logs revealed a full disk that the metrics weren't catching, it's basically your node's reality check that turns "please run this" into actual running containers.
- Container Runtime (containerd/CRI-O): Think of this as kubelet's muscle, the actual engine that pulls images and spins up containers when kubelet says jump. Remember the great dockershim panic of 2022 when everyone realized Kubernetes was divorcing Docker? I spent a weekend migrating my cluster to containerd only to find out it was already using it under the hood, turns out Docker was just a middleman we didn't need anymore.
- kube-proxy: Your cluster's network traffic cop, managing iptables or IPVS rules on each node so when you hit a Service it actually reaches the right pods no matter where they're hiding. Debugging a connection timeout in my homelab taught me kube-proxy's rules are the first place to check, one misconfigured Service selector and your traffic goes into the void while everything looks healthy on the surface.
- CoreDNS: The cluster's phone book, translating those neat service names like
my-app.default.svc.cluster.localinto actual IPs so pods can find each other without hardcoding addresses. I learned its importance the hard way when DNS queries started timing out and suddenly nothing could talk to anything, turns out I had accidentally scaled CoreDNS to zero replicas during a "quick test" that wasn't so quick.

~~I know its a lot to digest but slowly read it to understand each part ~~
What happens through the whole process of trying to deploy something
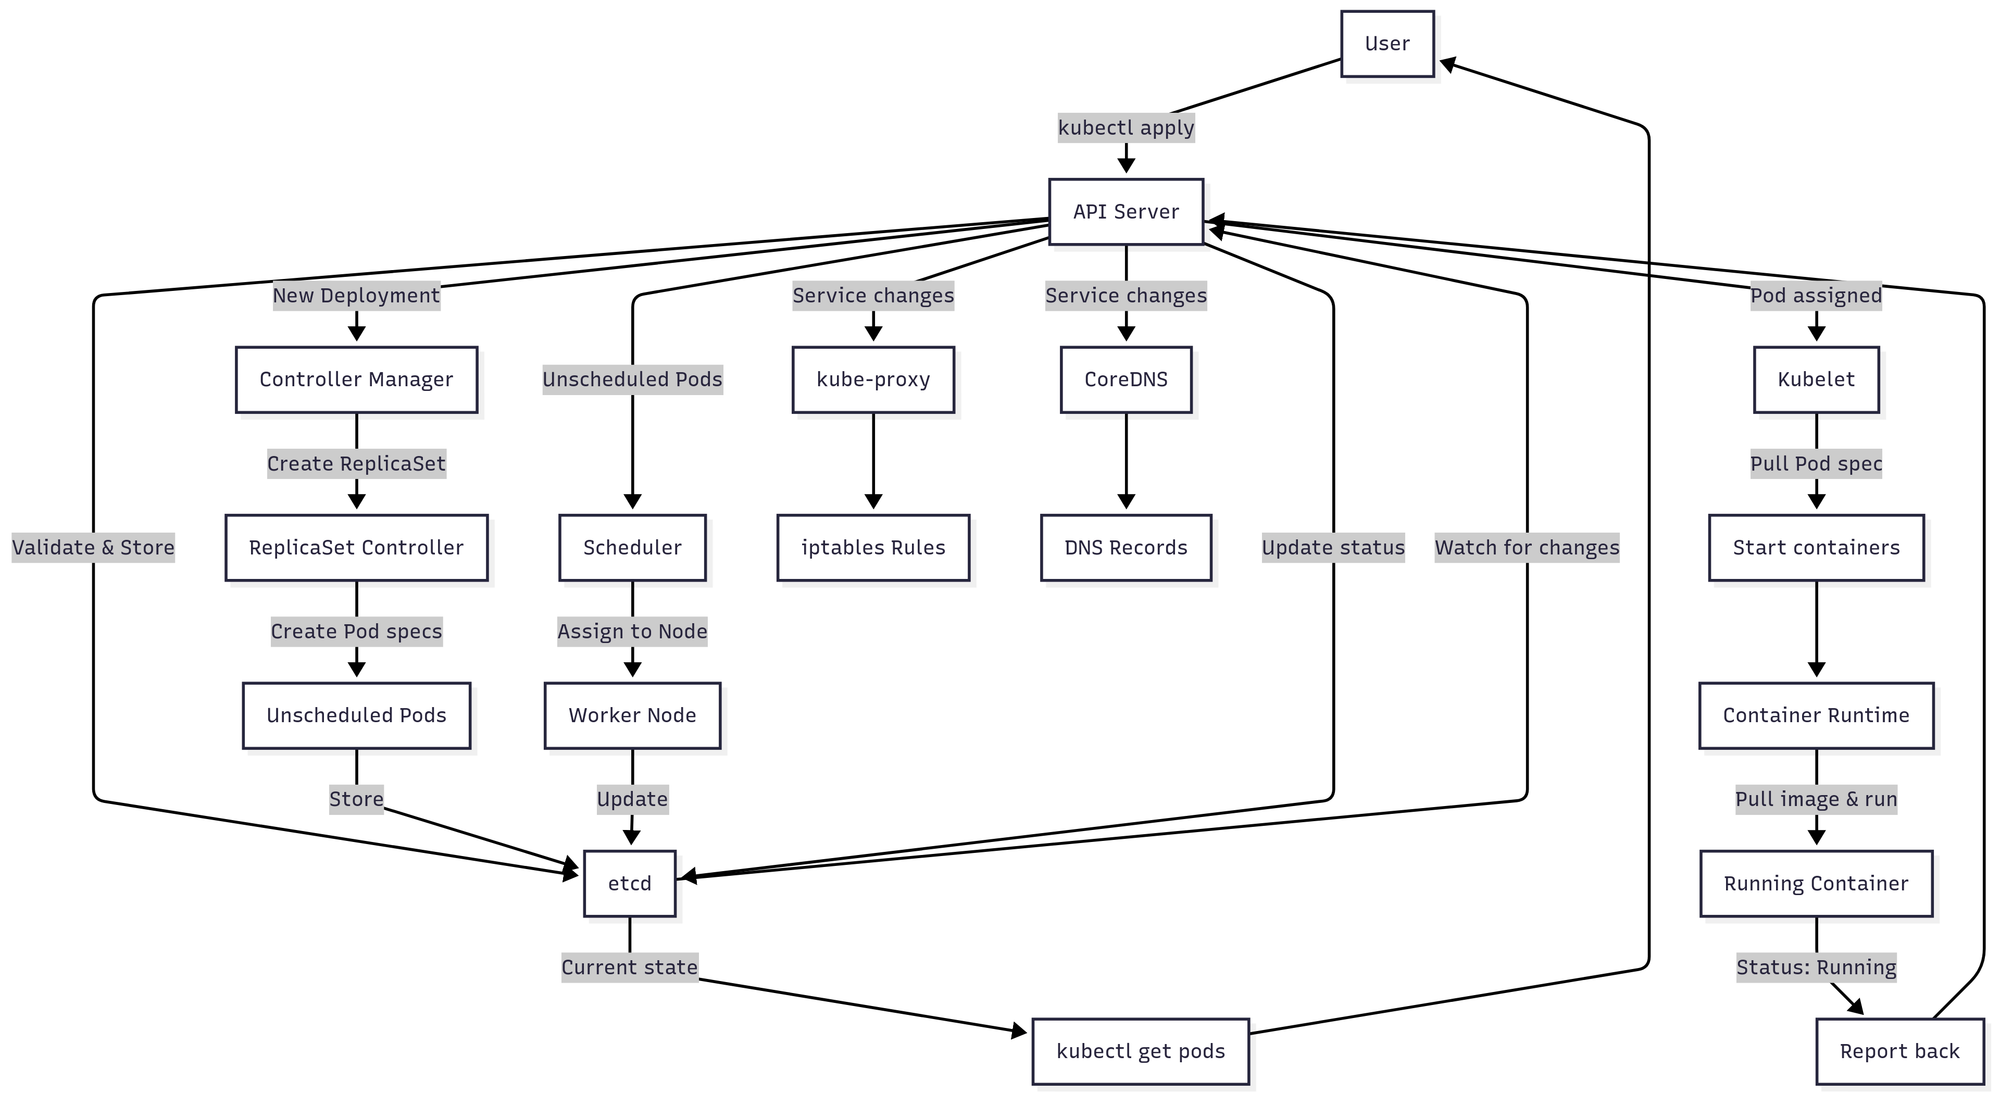
<file.yaml> → contains the deployment config
Using the command kubectl apply -f <file.yaml> you will also need the kubeconfig file
The kubeconfig is the file that proves you have access to the cluster, you would either have admin perms to do anything or set permissions based on what the user has given you
Once kubectl sends the request, the API Server acts as the gateway to the cluster. It:
- Validates the YAML syntax and ensures the deployment spec is correct
- Authenticates you using the kubeconfig credentials
- Authorizes whether you have permission to create deployments in the specified namespace (RBAC checks)
- Stores the desired state in etcd (the cluster's brain/database)
The Controller Manager continuously watches etcd through the API Server for changes. When it detects your new deployment:
- The Deployment controller creates a ReplicaSet to manage the desired number of pod replicas
- The ReplicaSet controller creates Pod specifications (but they're not scheduled to nodes yet - they exist only as definitions with status: Pending)
The Scheduler watches for unscheduled pods through the API Server and:
- Evaluates available nodes based on resource requirements (CPU, memory)
- Considers constraints like node selectors, affinities, taints, and tolerations
- Checks data locality and spreading rules
- Assigns each pod to the most suitable worker node
- Updates the pod spec with the node assignment
Once pods are scheduled, the kubelet (agent on each assigned worker node):
- Watches the API Server for pods assigned to its node
- Pulls the pod specifications
- Instructs the container runtime (containerd/CRI-O) to pull container images from the registry
- Creates and starts the containers
- Sets up pod networking and volumes
- Monitors container health and resource usage
- Reports pod status back to the API Server (Running, Failed, etc.)
Meanwhile, the networking layer activates:
- kube-proxy watches for Service and Endpoint changes through the API Server
- Updates iptables or IPVS rules on each node to route service traffic to healthy pods
- CoreDNS watches for Service updates and creates DNS entries so pods can discover services by name (like
my-service.default.svc.cluster.local)
This isn't a one-time process - Kubernetes continuously reconciles:
- The Controller Manager keeps checking if actual state matches desired state
- If a pod crashes, kubelet reports it and the ReplicaSet controller creates a replacement
- The Scheduler places new pods as they appear
- kube-proxy updates rules as pods come and go
- All components watch for changes through the API Server (the single source of truth)
- Every state change is persisted in etcd to survive restarts
Visual diagram
I hope this was a good detailed instruction on how Kubernetes works, it might feel overwhelming but its just a way to understand how it all works. There may be many things I haven't explained which will be in part 2, where we talk more in detail about what can be deployed and the complexity of the applications that be deployed and their feature
Member discussion